Smartnotebook Example 1: hsqc-basic
This example uses hncacb/cbcaconh experiment data with hsqc as the reference
spectra.
Start smartnotebook from within the hsqc-basic directory by typing the
name of the startup script.
	> cd snb-v5.1.3-examples1
	> cd hsqc-basic
	> snbview
The nmrview software should have started. If it did not, perhaps you have
not properly set up your "snbview" alias as mentioned in the
" installation page.
Next type "smartnotebook" in the nmrview console window (or "snb" for short).
> snb
After a short wait, you should now see the spectral strips, reference spectra
and smartnotebook main window displayed on your screen. Feel free to move
and re-size spectra and windows to fit nicely on the screen.
Great, let's see how we can go about making and assigning chains.
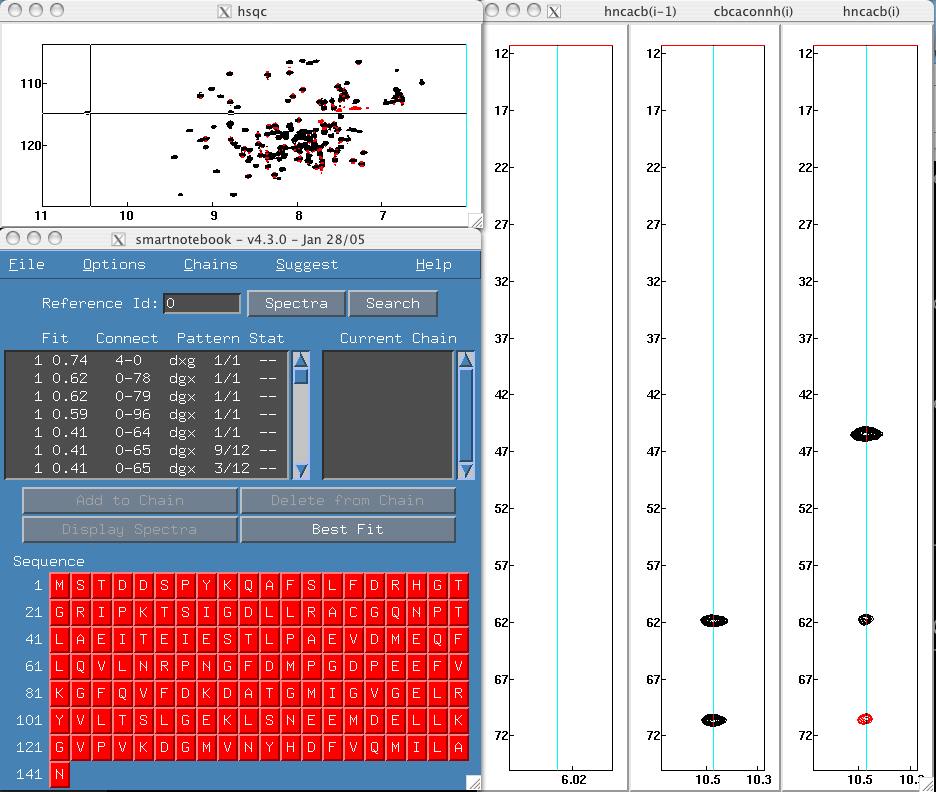
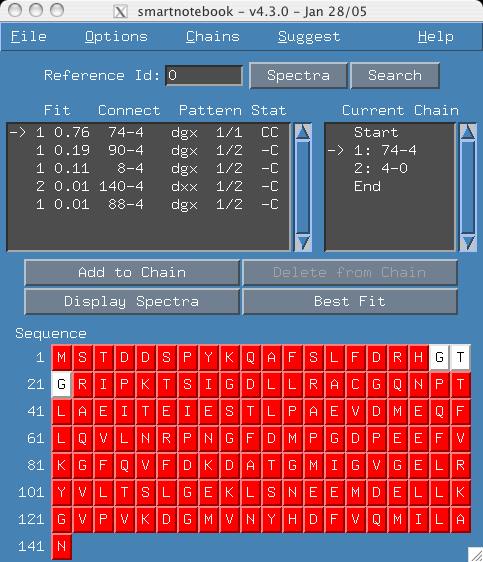
- Click on the leftmost peak in the hsqc spectral display. A set of black cursors appears over the
peak. On the smartnotebook main window, click on
the "Spectra" button. You should see that we have selected Reference Id 0.
Note: For MacOSX you may have to click twice on the button, the first click
just activates the window.
Fig 1
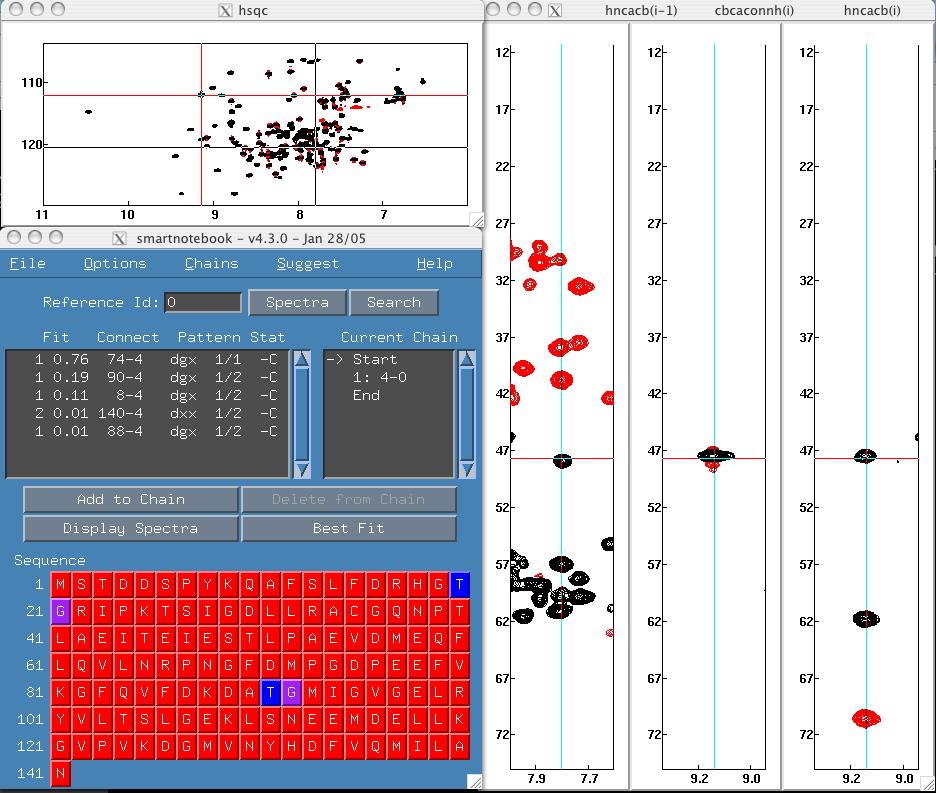
- Click on the first connection in connections
panel listing which is "4-0". The whole line is hilighted. Click
"Display spectra" to display and verify that the
connectivity is good.
Fig 2
- Click "Add to Chain". You now see 2 possible
places in the sequence where this 2 residue chain
can be assigned.
Fig 3
- In the Current Chain panel, click on the word
"Start". We are going to add a connectivity to the
start of the current chain.
- There are 5 connectivities that can be
appended to the start of the current chain. Click
on the "74-4" entry, then click "Display Spectra".
Fig 4
- (optional) Click on a different connectivity
(eg 90-4) and hit "display spectra" to confirm
that this choice is not the correct one.
Fig 5
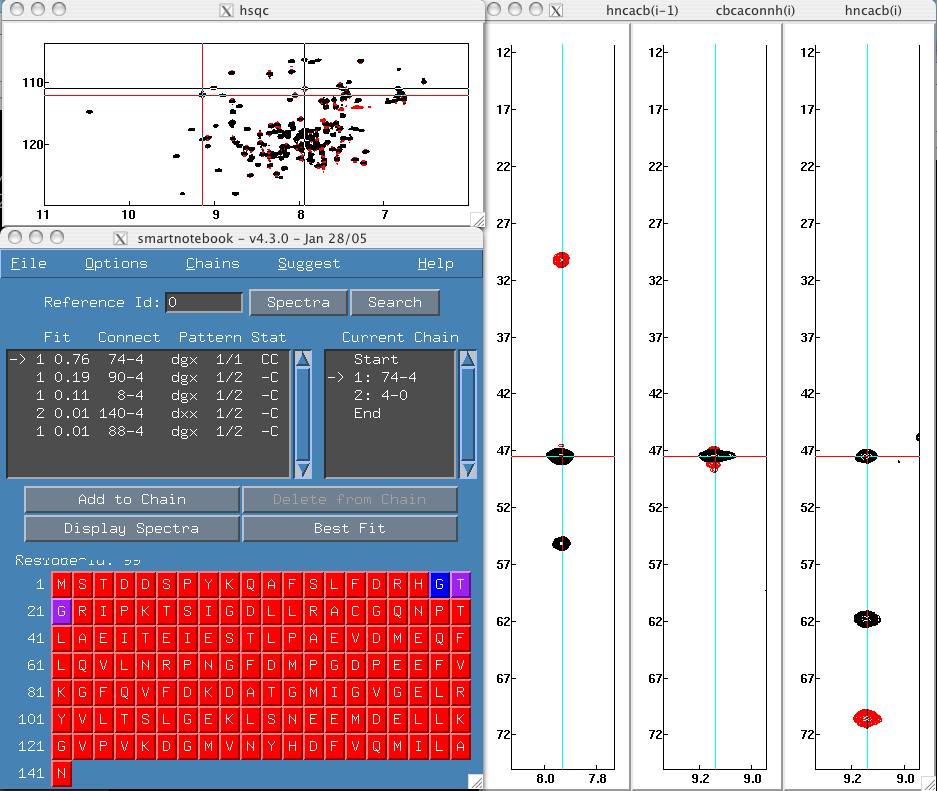
Click the "74-4" entry again.
- Click "Add to Chain".
The assignment is now unambiguous.
Fig 6
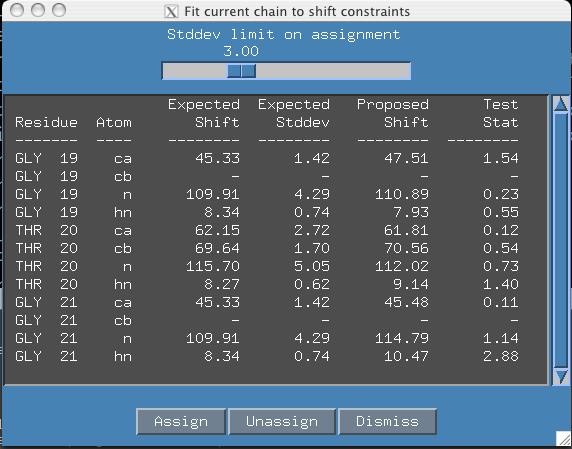
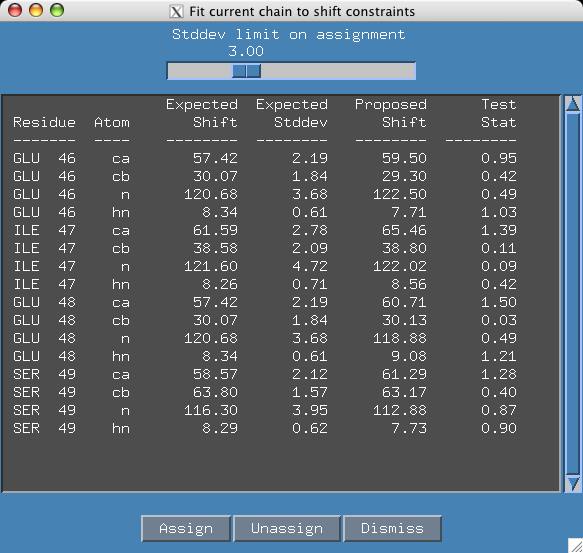
- Select the "Best Fit" button. This
allows us to verify how each chemical shift
associated with current chain fits the shift
constraints inherit with our sequence.
Fig 7
- After confirming the fit of each chemical
shift, hit the "Assign" button. You have made
your first assignment using smartnotebook! The
ppm.out and *.xpk files in your output directory
are updated with the correct shift values.
Fig 8
- (Optional) If you wish to continue to build
this chain, you must unassign it first.
Click unassign in the "Best Fit" window.
Now we start work on a second chain.
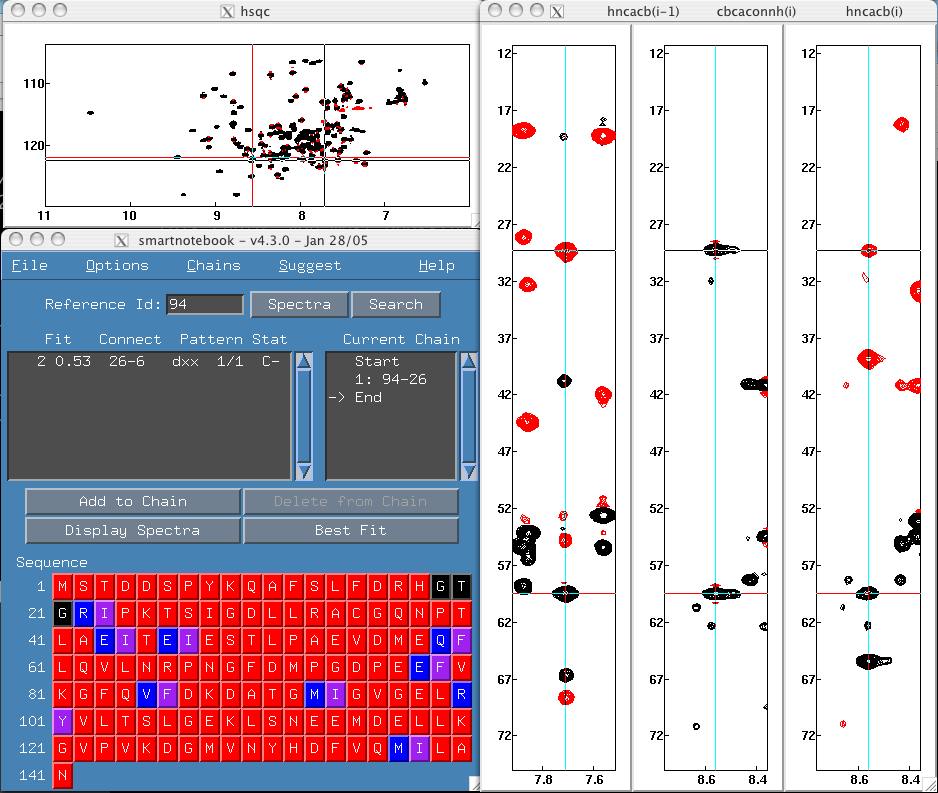
- Go to the "Chains" menu and select "Start
new chain". This time we enter 94 in the Reference
ID field and press return. For now, assume that
hsqc Id 94 is arbitrarily chosen by the user as an
interesting starting point. Note: You can search
for interesting starting points by clicking "Search".
Fig 9
- Click on "94-26" and hit "Display Spectra".
Fig 10
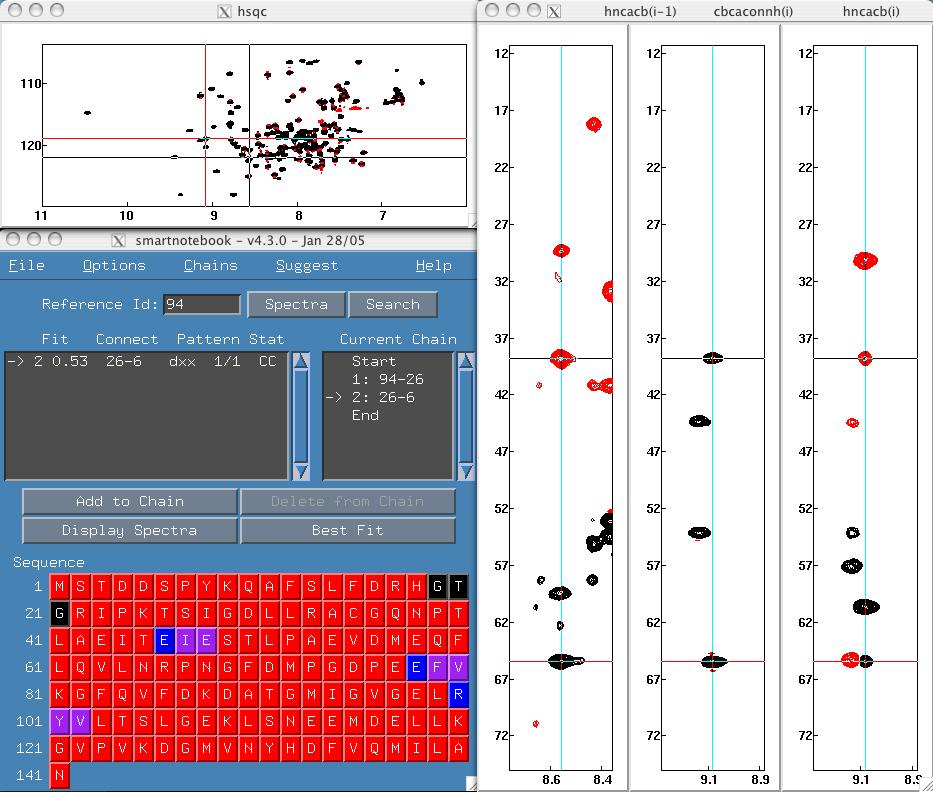
- Click "Add to Chain". You now see 9 possible
places in the sequence where this 2 residue chain
can be assigned.
Fig 11
- In the Current Chain panel, click on the
word "End". We are going to add a connection to the
end of the current chain. There is only one
connection that can be appended to the end of the
current chain. Click on the "26-6" entry.
Fig 12
- Click "Display spectra" to verify the connection
and "Add to Chain".
Fig 13
- Now there are only 3 possible places to assign
this chain. Click on the word "End" of the current
chain panel. Select the 6-116 connection, click
the "Display spectra" button and finally click the
"Add to Chain" button.
Fig 14
- The assignment is now unambiguous, select the
"Best Fit" button. Confirm the fit of
each chemical shift.
Fig 15
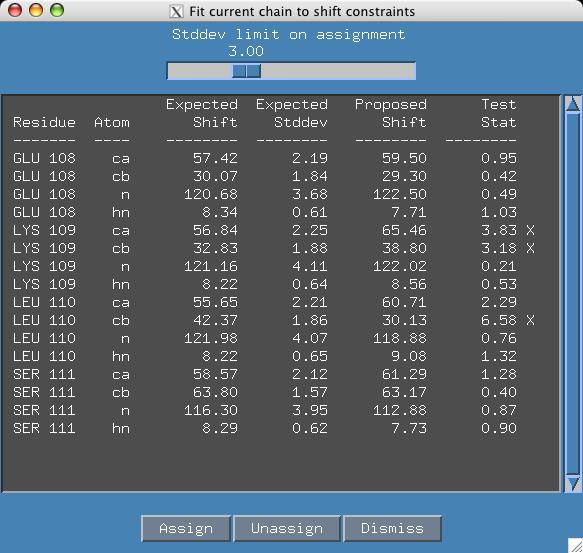
- (Optional) Are you at all curious how this short
chain fits other sections in your sequence? Try
clicking E108 in your sequence panel which on first
glance looks like another assignment possibility.
Notice that three proposed shifts exceed the expected
shifts threshold of 3.0 standard deviations. However,
smartnotebook does not prevent you from making this
assignment if that is what you want.
Fig 16
- (Optional) Are you interested in seeing how
long you can build this chain? Great, first make sure
your current chain is unassigned. Smartnotebook does
not allow you to edit an assigned chain. Now your
mission, if you decide to take it, is to find the
correct chain from Prolene to Prolene! Don't worry
if you can't get it, eventually you will want to
learn what all those numbers in the connections
panel mean.
- This example demonstrates an interesting
shift in assignment philosophy. It is not necessary
to start at certain amino acids in the sequence, just
start at a connection that looks 'right' and see where
the chain takes you. Software which pre-builds chains
for the user would be an asset in the smartnotebook
suite.
When you are finished playing, select the
"Quit nmrview" menu item under File.
 Smartnotebook Examples
This file last updated:
Questions to:
bionmrwebmaster@biochem.ualberta.ca